Leave It All | On the Floor the Infinite Possibilities of Painting Your Floors

It feels so daunting, but it looks so good. When it’s done right, a painted floor is a showstopper, adding interest, depth and charm to any space. Plus, painting the floor opens up infinitely more options than any other flooring choice because you can paint virtually any hard floor in any color and any pattern in any space. It can be a big decision, though, both because of the potential for an unforgettable dramatic statement and the anxiety that comes with a finish that is significantly more difficult to change than a carpet or shade of wood stain. But fear not: With a bit of careful planning and strategic inspiration, taking the leap is easier than you think!
Prep is key
You really can paint any hard flooring, including wood, tile, linoleum and concrete. Just like painting your walls, you need to fully prep the floor prior to painting, and that process looks a bit different depending on the type of flooring you have. All flooring requires a deep cleaning before anything else happens. If there’s any residue from wax, surface cleaners, or even rubber rug pads, the paint may not adhere to the floor, causing peeling and discoloration.
- Wood requires sanding, cleaning and priming. If the wood has any dents or holes, use wood filler before sanding to ensure the surface is smooth.
- For concrete floors, first fill any cracks and let it fully cure before painting, then lightly sand once completely dry. Use an epoxy-based primer only when the floor is completely dry.
- For all floors, but linoleum especially, ensure all grease and wax is removed, including in the tight spaces between linoleum tiles.
- To paint tile floors, first fill any cracks or replace any broken tiles and let it all fully cure. Then lightly sand the tiles— just enough to scuff the glazed surface. Thoroughly clean and let the floor completely dry before painting, especially the grout between tiles.
After prepping the floor, it’s up to you! There are paints made specifically for floors, but if you choose a durable sealant, you can get away with ordinary interior paint as well. Just be sure to avoid painting yourself into a corner by starting at the spot opposite the doorway so that you paint yourself out of the room. Keep kids, pets, and yourself out of the room until the paint is completely dry, even between coats. Once your paint job is finished, seal with polyurethane to increase durability.
 The design
First, you need to assess both your personal style and comfort level with the project. There are many examples of floors painted with intricate patterns and vibrant colors, but taking a simpler route can make just as bold a statement in your space. Think of your comfort level in incremental steps—the first step would be painting the floor in a solid neutral color, such as white, cream or gray. None of those options are “extreme” by any stretch, but all of them will have a substantial impact on the room. To illustrate, imagine the mid-2000s brown-toned bathroom many of us have in our homes, complete with beige ceramic tiles. Changing the earth-tone tile to a cooler, brighter cream could make all the difference if we wanted to change the overall feel of the space. Especially in a smaller room that may lack natural light, like a bathroom, using light neutral hues creates the illusion of brightness and height.
 The next step would be a solid natural color, such as green or blue, in a bright or pastel tone to both brighten the room and add a whimsical element. For example, in a study or playroom with otherwise white or light wood finishes, a solid sage green wood floor anchors the space without weighing it down—keeping the overall vibe light, fresh and unfussy. To push the envelope, consider a solid paint in a high-gloss finish to really brighten things up.
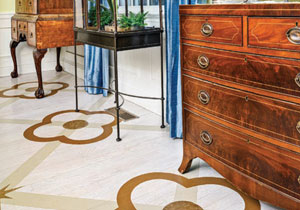
 But remember, because of the unlimited possibilities, this is your opportunity to have the floors of your dreams! For instance, if you’ve always loved the minimalist elegance of black-and-white checkerboard marble, painting the linoleum in the kitchen or hallway is a bank-account-friendly way of bringing that dream into reality. Or, if you’re looking for a bit more color, consider New England cottage classic checkerboard floors in blue, yellow, beige or pink. Keeping things simple and taking inspiration from both timeless pattern choices and trendier color options can guide your decisions for your unique space.
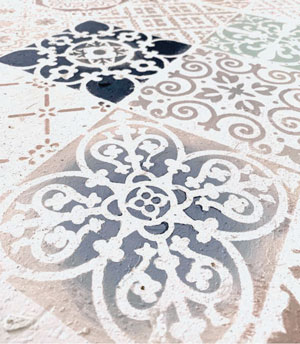
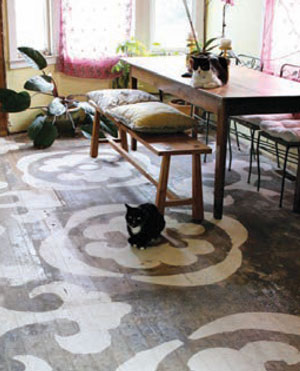
 Of course, there are plenty of patterns to consider. If you’re drawn to simple large-scale patterns, consider stripes or concentric rectangles. If you’re looking for a more intricate design, explore geometric tile-like designs or stencils. Or, if you really want to make a statement, consider painting a bright stair or hallway “runner” to add the interest without the added vacuuming!
In addition to expressing your personal style, painting floors has environmental and budget benefits. For example, if you’re ready to move on from the midcentury wood parquet overlay in the family room, opting to paint it instead of removing it could be a more practical option. With parquet overlay in particular, the process of removing each piece of flooring requires intensive labor, either by you or a contractor, costing you time and money. Then, of course, the old flooring needs to be disposed— likely going to a landfill since many flooring adhesives are nonrecyclable. Painting the floor instead would save both your wallet and the planet.
Yes—painting the floor can feel daunting, but with a little thought, time, and elbow grease, the benefits truly outweigh the risks. Don’t be ashamed to start small, and don’t be afraid to go big! ✦
concrete, design, intricate design, large-scale patterns, linoleum, painted floor, patterns, personal style, prepping the floor, tile, Wood