Before You Call for Repairs…| 5 Common DIY Household Fixes

As the pandemic continued, social media feeds filled with images of home improvement: additions for at-home work (and escaping others); lavish decks and outdoor living areas; refreshed kitchens to accommodate meal prep and consumption. In some cases, the improvements were undertaken by homeowners themselves, eager to demonstrate newfound and, in many cases, self-taught skills.
But what of the mundane? The unexpected repair or simple update that doesn’t warrant a Facebook or Instagram post? These small fixes, while not as glamorous as a freshly tiled backsplash or newly laid flooring, are essential elements in our lives at home. No matter your skill set and capabilities, it’s good to feel comfortable undertaking a simple repair. Here are five you can likely manage—or learn to do so.
Repair a hole in drywall
As solid as our homes might be, drywall isn’t impervious to damage. A thrown toy, a door that bangs into a wall, or even a dropped picture that bounces off the floor can make a hole. The good news: Holes up to 6 inches square can be filled using paper tape (for the smallest jobs) or wire mesh, (for larger repairs). You’ll also need spackle, a flat putty knife, fine-grain sandpaper and, of course, paint in the color of the wall being fixed. The biggest challenge, honestly, is letting the spackle dry completely before sanding and painting over it. Don’t rush the process.
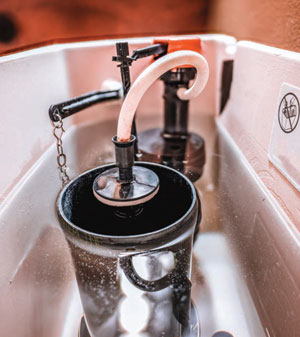 Fix a running toilet
The irony of the running toilet—so known because we hear water flowing to refill a tank—is that it can be easy to overlook. Once the problem reveals itself, however, this is usually an easy repair. First, diagnose the problem. Remove the tank lid and flush the toilet, noticing the various mechanisms: the fill tube, the flapper (on the floor of the tank) and the float arm or bobble, usually attached to a chain or lever. All of these parts can simply wear down over time and can be replaced without tools. Local hardware stores will have individual replacement parts or kits. When the time comes to do the work, be sure to drain the tank first, by closing the water valve (found at the bottom rear of the toilet, close to the wall) and then flushing, which will empty the tank and keep your hand dry while you solve the problem.
 Change/replace a light fixture
This one’s a little trickier than fixing a toilet, but only because it involves electricity. And once you discern which switch in the circuit box applies, you’re really home free. If you’re switching out the fixture with one that has a similar, if not identical, base, the biggest challenge is ensuring you have enough electrical wire to connect to the new fixture. Nearly all replacement fixtures will come with wire caps, which you’ll use to connect the wires from the new light to the existing wires in the wall. Be sure to twist the wires clockwise before you put the cap on the end, since that will also turn clockwise.
 Fix a leaky faucet
Nothing is more irritating—and also wasteful—than a leaky faucet. Again, the first step is to turn off the water from under the sink. (This might take a while, depending on what’s stored in that cupboard.) Once the water is off, open the tap to release any water still in the pipes. Then you can start disassembling the faucet to find the culprit. Sometimes, the leak is in the handle, which is often a sign that the O ring needs to be repaired. If the leak is at the spout, that’s usually an indication that a washer has corroded or otherwise worn. If you don’t have the manual for your faucet, remove the part in need of replacement and make a quick trip to the hardware store for the (inexpensive) part you need.
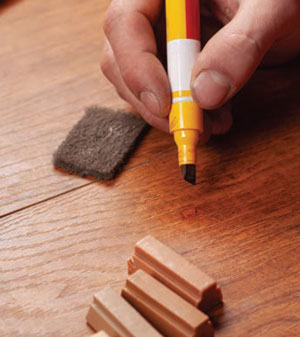 Repair nicked/scratched wood floors
The beauty of wood floors is that they age gracefully, absorbing the usual wear and tear of families. But a dragged piece of furniture or particularly aggressive game of indoor hockey (hey, it can happen) can easily lead to a more dramatic scratch that stands out from the rest. If you’re dealing with a smallish imperfection, and depending on the color of your floor, you may be able to conceal it naturally, by rubbing a walnut—the nut itself, not the shell—on the scratch or applying a mixture of apple cider vinegar and olive oil. You can try coloring the scratches with blending pencils or markers, or even lightly sanding the area and reapplying stain. Be careful: This is one fix where you can actually make the problem worse.
There’s no shame in calling a professional for help. But there’s a great deal of satisfaction—and reduction in cost— when you take on small repair jobs yourself. ✦
circuit box, diy, drywall, fine-grain sandpaper, household fixes, leaky faucet, light fixture, O ring, paper tape, putty knife, running toilet, scratched wood floors, spackle